Wednesday, October 27, 2010

Rebuilding of a mouse droid....part 2

Welcome back to the Rebuilding of a mouse droid blog series.  I'd first like to apologies for the length in between this post and the last post.  A sick bug has been rampant in my apartment and my wife and I kept handing it off.

This will be part 2 and the final in the series.  We will be doing a bit more resurfacing as well as securing the mouse droid body to our car chassis as well as doing some repainting. So lets get started.


When we ended last time, the mouse droid still looks a bit shabby.  There were a lot of rough panels and the paint was in bad shape, not to mention that if we were to drive it, as soon as we took a turn the body would have fallen off the car chassis, lol


So lets start by adding another replacement panel to the other side and a new panel on the front, both on the bottom like we did with the first one..  Take the same steps to measure carefully and cut out the shapes.  Remember this rule: measure twice, cut once.  You can't fix it once you've cut it, you'll have to start over with a new piece.  Glue those new panels on with the all purpose craft glue and then use the tape to hold them in place.  Once the glue is set, take your black paint and give them a nice coat of black.


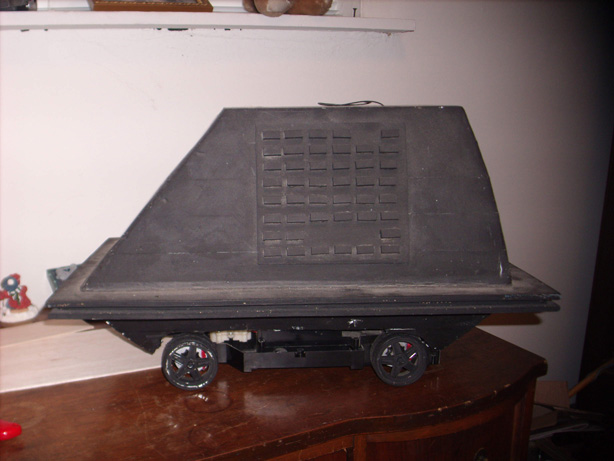
Ok, now that we have replaced and painted the new panels, we need to work on making the mouse droid body secure to the R/C car chassis.  I took off the car so you could get a really good look inside.  As you can see, I have placed several supports inside to hold up the body, but we need a place to physically attach them together.  I took some 1/2" x 1/4" basswood square rods and cut them in to 4 4" long pieces.  I took the craft glue and glued on the first piece on each side directly underneath where the screw hold in the chassis are when it was attached to the old car body.  After they set, I used high strength epoxy to attach the next piece of wood to the first.  I used the epoxy on the second since wood to wood is fine for epoxy, but if I were to use the epoxy on the foam, it would melt the foam and we'd have a much bigger problem then.

Note: I left the underside unpainted as it makes the supports more visible


Close up of the connection point just made.


Now take the car chassis and, using some nice 3" long drywall screws (they have a large bit to hold on better), slowly screw them in to the connecting brackets we just put in the body.  Once they are in and snug, flip it over and give it a little shake test to make sure it is secure.  While doing this, I had the battery on charge for just this moment.  We're done!  We have rebuilt a mouse droid and it's lookin good.  Below are the finished pitcures and a video of me driving it around in the parking lot of my apartment.


I hope you enjoyed this blog and if you have any questions of comments, please feel free to comment and I'll reply quickly.  


Monday, October 4, 2010

Rebuilding of a mouse droid....part 1

So I was digging through some of my old stuff and I ran across my old mouse droid I had made years ago.  It was a bit worse off then I had remembered.  So, I thought, this will be a perfect subject for my blog and it gives me an excuse to repair/rebuild it.


So here are pics of it as I found it...


As you can see, it has seen better days.  So, I went to my local craft store and picked up 3 sheets of basswood (2 of 6"x36"x3/32" and 1 of 1/8"x1"x36"), some dowel rod (24"x3/8"), 2 small packs of "people", some scotch tape, some black craft paint and brush as well as some all purpose craft glue.

The first thing I did was to repair the wheel well on the one side where it had completely broken off.  I took some basswood and measured out the area it would sit and then marked where the wheels would go.


I then cut out the parts that should not be there with a sharp exacto knife.  I took a bit of sand paper to smooth out the edges and then put glue all over the wood and placed it on the droid body, using tape to hold it in place.


Once that was dry, I went to work on the antennas on top.  I had one but needed to recreate a new one that I thought would look good. First I took some time and re-glued the one I had to the top of the mouse droid so that I could use it to make a good comparison with the new one I was going to need to make.


So, to make a new antenna, I took my smakk sheet of wood and cut it to the width of the top of the droid.  I then took and cut a second piece the same way.  I took the second piece and cut it length ways so I would have one 3/4" wide and another 1/4" wide.  I then glued them together to make a sort of tray looking piece.


I then took and glue 6 of the wooden "people" evenly spaced along the back of it inside the tray.  Once they were dry, I gave them a coat of black paint as to get a better look at how it compared.


Next I took the dowel rod and cut 5 pieces off at  1" high, used sand paper to smooth the tops and placed them along the other edge, spaced evenly and place between the "people".  Again, once dry, I painted them for comparison purposes. 


It's a little different, but I do like the look.  And here is where I end it toady.  I will be posting the finishing of it in the next couple of days. Until then....


I hope this blog has been helpful and if you have any questions or comments, please feel free to post a comment and I'll reply to it quickly.


Friday, October 1, 2010

Take a chance....

Today, I was sitting around, watching Episode I and thought to myself, I'd love to have myself a chance cube.  They are way cooler then just flipping a coin to decide something.  So, I made one and here is how to do it.

They are very easy to make.  First, take a single pack of sculpey (oven-bake clay, any color will work),


make yourself a small cube about 1" x 1".  Make sure it is not perfect since it should look like it has been used ALOT! lol.


Now bake it in the oven at recommended temperature and time letting it cool properly after.


Now taking the layout below, give your cube a paint job.


Don't make the edges look perfect either, just kinda haphazardly paint each side.  Now you own your very own chance cube, use it well and often!


I hope this was helpful and I hope you enjoyed it.  If you have any questions of comments, please feel free to post a comment and I'll reply quickly!

You can also find some of my stuff from time to time on Etsy.com