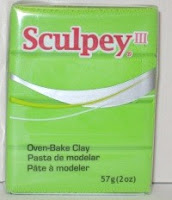
First, you will need to pick up 2 packs of oven-bake clay, such as sculpey
Now, take the sculpey and open up both packs and knead them for about 2 mins to make the clay workable. Take about 1/2 of the clay and roll it out in to a nice smooth sheet about 1/4" or a little less. Now cut a circle in it about 1 3/4" in diameter. remove the clay from around it and set the circle aside for now.
Now take the other half of the clay and roll it back and forth in your hands to make a snake like length. lay it down now and keep lightly rolling it out to a nice long snake about 7/16" in diameter.
Now take the snake and gently roll it around the outside edge of the circle you cut earlier. As you get around to the starting end, just cut off the extra length and smooth the 2 ends together. Take your time as this won't harden until you bake it. You can take your time smoothing it to look right.
Now take some of the clay left after cutting the circle (if you didn't leave it smoothed out, no worries, just roll it out again) and lets cut 3 triangle shapes. These will be detail items for inside the top. Gently place them in the inner circle and make sure they are spaced evenly. Once they are spaced, use a pen, pencil or your exacto knife end to smooth the back edge against the outer circle.
Now take it and bake it in the over as the clays instructions state. Once it is done, we will start on the next part.
NOTE: Never work on other parts of the project while your clay is baking. If it over bakes even a little, it will blacken and bubble and be ruined.
Ok, now that the first part is out of the over and cooling, let make the last part. The antennas that are around the outside of the Holoprojector. Take some of the left over clay and roll it out to about 1/4" think. Now cut your antennas out slowly as to not mess them up. Now remove the extra clay from the antennas
and smooth them out so that are more rounded then squared off. (See finished picture). Gently pick them up and move them to your baking pan. Take a moment to smooth them out and make sure they are in the correct shape. Bake them as before, making sure you do not burn them.
and smooth them out so that are more rounded then squared off. (See finished picture). Gently pick them up and move them to your baking pan. Take a moment to smooth them out and make sure they are in the correct shape. Bake them as before, making sure you do not burn them.
Now comes the long part, attaching the antennas. Use your 5 mins, high strength epoxy here. Mix up a very small batch, enough to glue 1 of the antenna on, and hold them together for the 5 mins. After that, it will not be going anywhere so just repeat the process 2 more times, making sure that you space them evenly around the outside edge.
Now to paint your Holoprojector. Here is a picture of one of my Holoprojectors that you can use as sort of a color key as to what should be what color. Remember, this is YOUR Holoprojector so you can actually make it any color you wish. If you want it purple with pink antenna, then go for it!
You now have your very own Jedi Holoprojector, use it and display it well!
I hope this was helpful and I hope you enjoyed this blog. If you have any questions or comments, please comment here and I will reply quickly!


Can't wait to see the finished photo. This tutorial is fan-tastic!
ReplyDelete