Wednesday, October 27, 2010

Rebuilding of a mouse droid....part 2

Welcome back to the Rebuilding of a mouse droid blog series.  I'd first like to apologies for the length in between this post and the last post.  A sick bug has been rampant in my apartment and my wife and I kept handing it off.

This will be part 2 and the final in the series.  We will be doing a bit more resurfacing as well as securing the mouse droid body to our car chassis as well as doing some repainting. So lets get started.


When we ended last time, the mouse droid still looks a bit shabby.  There were a lot of rough panels and the paint was in bad shape, not to mention that if we were to drive it, as soon as we took a turn the body would have fallen off the car chassis, lol


So lets start by adding another replacement panel to the other side and a new panel on the front, both on the bottom like we did with the first one..  Take the same steps to measure carefully and cut out the shapes.  Remember this rule: measure twice, cut once.  You can't fix it once you've cut it, you'll have to start over with a new piece.  Glue those new panels on with the all purpose craft glue and then use the tape to hold them in place.  Once the glue is set, take your black paint and give them a nice coat of black.


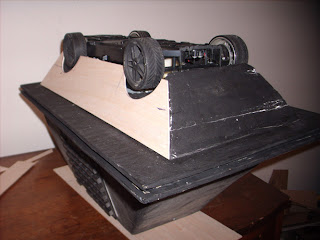
Ok, now that we have replaced and painted the new panels, we need to work on making the mouse droid body secure to the R/C car chassis.  I took off the car so you could get a really good look inside.  As you can see, I have placed several supports inside to hold up the body, but we need a place to physically attach them together.  I took some 1/2" x 1/4" basswood square rods and cut them in to 4 4" long pieces.  I took the craft glue and glued on the first piece on each side directly underneath where the screw hold in the chassis are when it was attached to the old car body.  After they set, I used high strength epoxy to attach the next piece of wood to the first.  I used the epoxy on the second since wood to wood is fine for epoxy, but if I were to use the epoxy on the foam, it would melt the foam and we'd have a much bigger problem then.

Note: I left the underside unpainted as it makes the supports more visible


Close up of the connection point just made.


Now take the car chassis and, using some nice 3" long drywall screws (they have a large bit to hold on better), slowly screw them in to the connecting brackets we just put in the body.  Once they are in and snug, flip it over and give it a little shake test to make sure it is secure.  While doing this, I had the battery on charge for just this moment.  We're done!  We have rebuilt a mouse droid and it's lookin good.  Below are the finished pitcures and a video of me driving it around in the parking lot of my apartment.


I hope you enjoyed this blog and if you have any questions of comments, please feel free to comment and I'll reply quickly.  


Monday, October 4, 2010

Rebuilding of a mouse droid....part 1

So I was digging through some of my old stuff and I ran across my old mouse droid I had made years ago.  It was a bit worse off then I had remembered.  So, I thought, this will be a perfect subject for my blog and it gives me an excuse to repair/rebuild it.


So here are pics of it as I found it...


As you can see, it has seen better days.  So, I went to my local craft store and picked up 3 sheets of basswood (2 of 6"x36"x3/32" and 1 of 1/8"x1"x36"), some dowel rod (24"x3/8"), 2 small packs of "people", some scotch tape, some black craft paint and brush as well as some all purpose craft glue.

The first thing I did was to repair the wheel well on the one side where it had completely broken off.  I took some basswood and measured out the area it would sit and then marked where the wheels would go.


I then cut out the parts that should not be there with a sharp exacto knife.  I took a bit of sand paper to smooth out the edges and then put glue all over the wood and placed it on the droid body, using tape to hold it in place.


Once that was dry, I went to work on the antennas on top.  I had one but needed to recreate a new one that I thought would look good. First I took some time and re-glued the one I had to the top of the mouse droid so that I could use it to make a good comparison with the new one I was going to need to make.


So, to make a new antenna, I took my smakk sheet of wood and cut it to the width of the top of the droid.  I then took and cut a second piece the same way.  I took the second piece and cut it length ways so I would have one 3/4" wide and another 1/4" wide.  I then glued them together to make a sort of tray looking piece.


I then took and glue 6 of the wooden "people" evenly spaced along the back of it inside the tray.  Once they were dry, I gave them a coat of black paint as to get a better look at how it compared.


Next I took the dowel rod and cut 5 pieces off at  1" high, used sand paper to smooth the tops and placed them along the other edge, spaced evenly and place between the "people".  Again, once dry, I painted them for comparison purposes. 


It's a little different, but I do like the look.  And here is where I end it toady.  I will be posting the finishing of it in the next couple of days. Until then....


I hope this blog has been helpful and if you have any questions or comments, please feel free to post a comment and I'll reply to it quickly.


Friday, October 1, 2010

Take a chance....

Today, I was sitting around, watching Episode I and thought to myself, I'd love to have myself a chance cube.  They are way cooler then just flipping a coin to decide something.  So, I made one and here is how to do it.

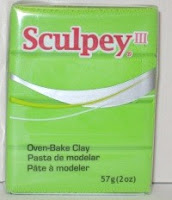
They are very easy to make.  First, take a single pack of sculpey (oven-bake clay, any color will work),


make yourself a small cube about 1" x 1".  Make sure it is not perfect since it should look like it has been used ALOT! lol.


Now bake it in the oven at recommended temperature and time letting it cool properly after.


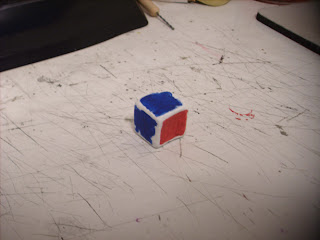
Now taking the layout below, give your cube a paint job.


Don't make the edges look perfect either, just kinda haphazardly paint each side.  Now you own your very own chance cube, use it well and often!


I hope this was helpful and I hope you enjoyed it.  If you have any questions of comments, please feel free to post a comment and I'll reply quickly!

You can also find some of my stuff from time to time on Etsy.com

Tuesday, September 28, 2010

Qui-Gon Jinn's Holoprojector and you...

As a prop junkie, I feel that I really should own as much as I can while not making my wife want to divorce me, lol.  So for those that want to add more to that Jedi collection or to your costume, here is how to make a Jedi holoprojector.

First, you will need to pick up 2 packs of oven-bake clay, such as sculpey


Now, take the sculpey and open up both packs and knead them for about 2 mins to make the clay workable.  Take about 1/2 of the clay and roll it out in to a nice smooth sheet about 1/4" or a little less.  Now cut a circle in it about 1 3/4" in diameter.  remove the clay from around it and set the circle aside for now.


Now take the other half of the clay and roll it back and forth in your hands to make a snake like length.  lay it down now and keep lightly rolling it out to a nice long snake about 7/16" in diameter.


Now take the snake and gently roll it around the outside edge of the circle you cut earlier.  As you get around to the starting end, just cut off the extra length and smooth the 2 ends together.  Take your time as this won't harden until you bake it.  You can take your time smoothing it to look right.


Now take some of the clay left after cutting the circle (if you didn't leave it smoothed out, no worries, just roll it out again) and lets cut 3 triangle shapes.  These will be detail items for inside the top.  Gently place them in the inner circle and make sure they are spaced evenly.  Once they are spaced, use a pen, pencil or your exacto knife end to smooth the back edge against the outer circle.  


Now take it and bake it in the over as the clays instructions state.  Once it is done, we will start on the next part. 

NOTE: Never work on other parts of the project while your clay is baking.  If it over bakes even a little, it will blacken and bubble and be ruined.


Ok, now that the first part is out of the over and cooling, let make the last part.  The antennas that are around the outside of the Holoprojector.  Take some of the left over clay and roll it out to about 1/4" think.  Now cut your antennas out slowly as to not mess them up.  Now remove the extra clay from the antennas

and smooth them out so that are more rounded then squared off. (See finished picture).  Gently pick them up and move them to your baking pan.  Take a moment to smooth them out and make sure they are in the correct shape.  Bake them as before, making sure you do not burn them.


Now comes the long part, attaching the antennas.  Use your 5 mins, high strength epoxy here.  Mix up a very small batch, enough to glue 1 of the antenna on, and hold them together for the 5 mins.  After that, it will not be going anywhere so just repeat the process 2 more times, making sure that you space them evenly around the outside edge.


Now to paint your Holoprojector.  Here is a picture of one of my Holoprojectors that you can use as sort of a color key as to what should be what color.  Remember, this is YOUR Holoprojector so you can actually make it any color you wish.  If you want it purple with pink antenna, then go for it!
Note: see how the antenna have been smoothed our to be more round looking.


You now have your very own Jedi Holoprojector, use it and display it well!


I hope this was helpful and I hope you enjoyed this blog.  If you have any questions or comments, please comment here and I will reply quickly!


Sunday, September 26, 2010

You too can be cool like Han!

Today’s project is a really cool one.  Ever watch Star Wars, the cantina scene where Han Solo shoots Greedo (yes, Han shoots first!  Worst thing they ever did was change that epic scene.) and think to yourself, “Man, if I had a gun like that, I could be as cool as him.”?  Well, today in my blog, I’m going to tell you how to go about doing just that, getting yourself a gun just like that (sorry, it won’t really fire, so no taking it to a bar, lol).

The best thing is to find a really nice gun to start with.  Some people are all about metal, everything has to be metal.  This is fine, if you have a large budget since metal stuff costs a lot more.  I like to start with an Airsoft spring firing plastic BB gun.  It comes with a short clip (which we will use) and a long clip which we do not need.

You can pick them up at flea markets sometimes or you can find them on website businesses that sell BB and pellet guns. Hobbytron.com has been a good source for me over time for these guns.  They are a plastic version of a broomhandel mauser which is the gun they used for the original props.  You will also need to pick up some 3/8’ basswood in a small sheet, a 1" diameter wooden dowel rod,

an exacto knife, 2 packs of even-bake clay such as sculpey,

 high strength epoxy and black paint which you can get at any craft store.

You will also need a funnel and a simple straight scope which are available at any multipurpose store such as Walmart or even a sporting goods store.


So, your shopping list should look like this:

BB gun…………………………………………………..…........…..$7.00
Basswood sheet …………………………………………..….....….$3.00
Wooden dowel rod……………………………………………....…..$0.50
Exacto blade…………………………………………………......…..$3.00
2 packs of oven-bake clay…………………………………........….$2.00
High strength epoxy………………………………………….....…..$4.00
Black paint (brush on craft paint)……………………………....…..$1.00
Paint brush (something that is cheap but won’t fall apart)….......$1.00
Funnel……………………………………………………..………......$1.00
Scope………………………………………………….....……….......$10.00
---------------------------------------------------------------------------------------------------
Total cost of parts (on average)...…………………………………..$32.50


After you have your gun, there are a few steps in order to make it look like the one on screen.  First, the long plastic barrel extension has to go!  Next, cut off the small part of the barrel that is still sticking out with either a handsaw or dremel tool with a cutting wheel.


Ok, the gun is now prepped for us to start adding things to it. 

The first, and most inportant thing to remember is that if you have never done one before, is to relax and take your time.  This is not a race and there is no prize for finishing everything in 20 mins (which is actually not even possible, lol.).  All you will end up with is a product you will look at and see every single place you rushed and think about how you wish you had taken your time.

ok, now, lets make the flash hider. This is the item that sits at the from of the barrel and gives it that old school "lazer gun" kind of look that it has.  You will need to take your dowel rod that you bought about measure out  about 1 3/4" and make a nice straight cut at the line with either a saw or you can use a dremel like tool to do it.  Once you have that, lets grab the sculpey and open up the package.  You will need to knead it for about 2 mins to make is nice and workable.  Now take about 1/2 of the sculpey and you can take the remaining dowel rod and use it as a rolling pin to roll it our in a flat sheet about 1/8" - 1/16" think.


Now you are going to take the rolling out clay and wrap the piece of dowel you cut off.  as you wrap it, cut it to fit with your exacto knife and trim off the extra that hangs off both ends.  Take your time and smooth it out by hand and make it so you don't see any seam lines.


Now you can make any kind of markings you want to on here.  You can go with the original Han Solo look, or you can choose the one from Empire or even make one totally custom, it is totally up to you here.  Just take your exact or the back of your paint brush and make marks in the sculpey GENTLY!  If you push too hard or too fast you will over stretch the clay and end up with a warp you have to fix.


Ok, now lets make the piece for the front of the blaster.  Take the other pack of sculpey and knead it together with what was left of the first pack.  Roll it out to about a 1/4" think sheet.  set it on the front of the blaster and then trim it to the shape you want.  


Take a pencil or pen and use the tip to score line lines across the clay while it is on the gun, but don't push too hard since you will need to be able to pull it back off.  Now gently pull it back off, use your knife to get under the edges and slowly peel it back, trying to keep the basic shape it was just in.

Now take both your clay items and place them on a foil pan (standing up and make sure that the item you just finished making is standing up and in shape) and place them in the oven for the recommended baking times and temperatures.  There is will an odd smell while baking, but it will not cause any harm to anything or anyone so do not be alarmed or worry.  Take them out after baking and let them cool.  You can take the piece for the from of the gun and fit it to the gun at this point if you are worried about it fitting right.  It will be very hot, but you can hold it on with a pot holder of towel and hold it in shape on the gun and run it under cold water to harden it faster to the shape you want.


Next we work on the scope mounting bracket.  Take your sheet of basswood and we will mark it for out cuts.  Mark will give us a 4" x 5/8" area and the other we'll mark a 2" x 1 3/4" area.  Take your exact and gently cut these out of the sheet.  Now, lets take your epoxy and glue them together.  Let the epoxy sit for about 30 mins before we do any painting to it.


Lets grab the funnel we bought and finish the flash hider.  Take your funnel and measure 1 1/2" from the bottom and the cut it with your dremel or exacto since we need a nice smooth cut.  But be careful not to cut yourself.  Now take that piece and lets epoxy it to the end of the dowel we wrapped in clay and baked.  Once the epoxy sets and is cured, let take the black craft paint and paint that, the piece for the front of the gun and the scope bracket all black so they will now match the rest of the gun.  Now take your epoxy and lets glue on the part in front and the scope bracket.  These items will have no problem staying on by themselves so now you can just go watch a Star Wars flick while you wait for this to cure.


Ok, now that you have finshed what was supposed to be a 1 movie waiting period that turned in to a marathon, lets attach the flash hider.  This the tricky part, after you epoxy the flash hider to the end of the barrel, you will need to prop it up on its end and make sure it is level.  Now, this is one of the reasons we choose the 5 min epoxy.  You only need to worry about this for 5 mins which means you can even just sit there and hold it for 5 mins.  After that, it's not going anywhere so you can just set it down on it's side and let is cure.


Ok, all that is left is to attach the scope to the bracket we made.  Now if you fine that the bracket is too narrow for the scope to grab on to, you can always just add little shims cut from the basswood to widen it right where the clamp is and epoxy it on and paint it black.  Now sit back and take a look....


Now, as promise, you too can now be as cool as Han Solo!


I hope this helped and if you have any question or comments about this project, please comment on it and I will reply quickly!